Post
SDR and Aircraft Tracking
Posted on September 18, 2022 • 5 min read • 985 wordsI finally took a dive into playing around with some software defined radio tech, and started with ADS-B aircraft tracking
Amateur Radio and SDR
I’ve always been interested in learning about radio frequencies and amateur radio topics. But until recently, that’s all I was really doing - just learning about them and not doing anything hands on. In the past year I’ve been working on changing that a little bit. I’ve finally gotten my amateur radio license, and I’ve purchased a couple of SDR (software defined radio) units to tinker with as well.
So far, I’ve been able to (among other things) pick up radio stations, listen to ISS radio traffic, download images broadcast by the space station, and most recently, track local aircraft. I’ve always been fascinated with planes, and have thought many times about getting my private pilot’s license. I always come to the same conclusion on that one though - it’s a lot of money (~$10k) to spend on something that I’m not really even sure if I’d use all that often.
But anyway, let’s get into exactly how I went about setting up a Raspberry Pi to do some local aircraft tracking…
ADS-B
ADS-B stands for Automatic Dependent Surveillance-Broadcast. It’s a technology used to track aircraft position using satellite navigation and other sensors, with the aircraft periodically broadcasting that information. Technically, there’s an “in” and an “out” that are used to receive and broadcast the signals. In the US, the FAA requires aircraft to be equipped with ADS-B technology to fly in most controlled airspace, and many other countries require it to be used as well. The signals are meant to be picked up from fairly large distances on the ground, with aircraft that are flying several miles above the earth’s surface. There’s a minimum of 3 components you need in order to be able to receive and decode this information:
- An antenna capable of receiving on 1090 MHz
- Software to decode the signal
- Hardware the software can run on
In addition to seeing local aircraft in your area, you can also contribute to a much larger system that tracks them as well. Sites like FlightAware are very common, but I opted to start with ADS-B Exchange since they do not charge anything for any of their services and everything is community based. There’s several other sites you could contribute to if you wish, but I chose to go with those two. So let’s get into the actual set up of the system now…
Receiver Setup
Here’s the list of parts I used in my setup (Amazon affiliate links):
- Raspberry Pi 4B - Used to run all the software
- SDR Receiver - This receiver package is from ADS-B Exchange and includes the receiver, a small antenna, and an SD card pre-loaded with their Raspberry Pi software suite
- Antenna - This is a better antenna that can be installed outdoors
- Antenna cable - Short cable to go from the larger antenna to the receiver
Using this package from ADS-B Exchange makes things very easy to set up. Simply plug in the SDR receiver into a USB port on the Pi, connect the antenna to the receiver (either the one that came with it, or another antenna tuned for 1090 MHz), insert the SD card into the Pi and power it on. Everything is already set up on the SD card so that once it boots, you configure your Wi-Fi and you’re good to go. The only other step you need to do is “claim” your receiver at ADS-B Exchange, which is as simple as clicking on a link. Here’s the page on their site that goes into a little more detail on the process: ADS-B Exchange . If you’ve used the kit from them, start at step 3; but you can use these same steps if you’re building it from scratch also.
Sending to FlightAware
Once I was up and running with ADS-B Exchange (which really took about 5 minutes), I decided to use the same set up to send to FlightAware also. This is another very easy process.
SSH into the Raspberry Pi. If you’re using the pre-configured one, the credentials are pi/adsb123 unless you’ve changed them in the web interface. From there, enter the following commands (version numbers may be different):
wget https://flightaware.com/adsb/piaware/files/packages/pool/piaware/p/piaware-support/piaware-repository_7.2_all.deb
sudo dpkg -i piaware-repository_7.2_all.deb
This preps the Pi with the correct repository. After that run
sudo apt update
sudo apt install piaware
And then if you want to enable automatic updates, run the following commands:
sudo piaware-config allow-auto-updates yes
sudo piaware-config allow-manual-updates yes
Reboot the Pi using sudo reboot. Once it comes back up, you’ll need to “claim” it
here
. These instructions are from
https://flightaware.com/adsb/piaware/install
, starting at step 2.
Next Steps
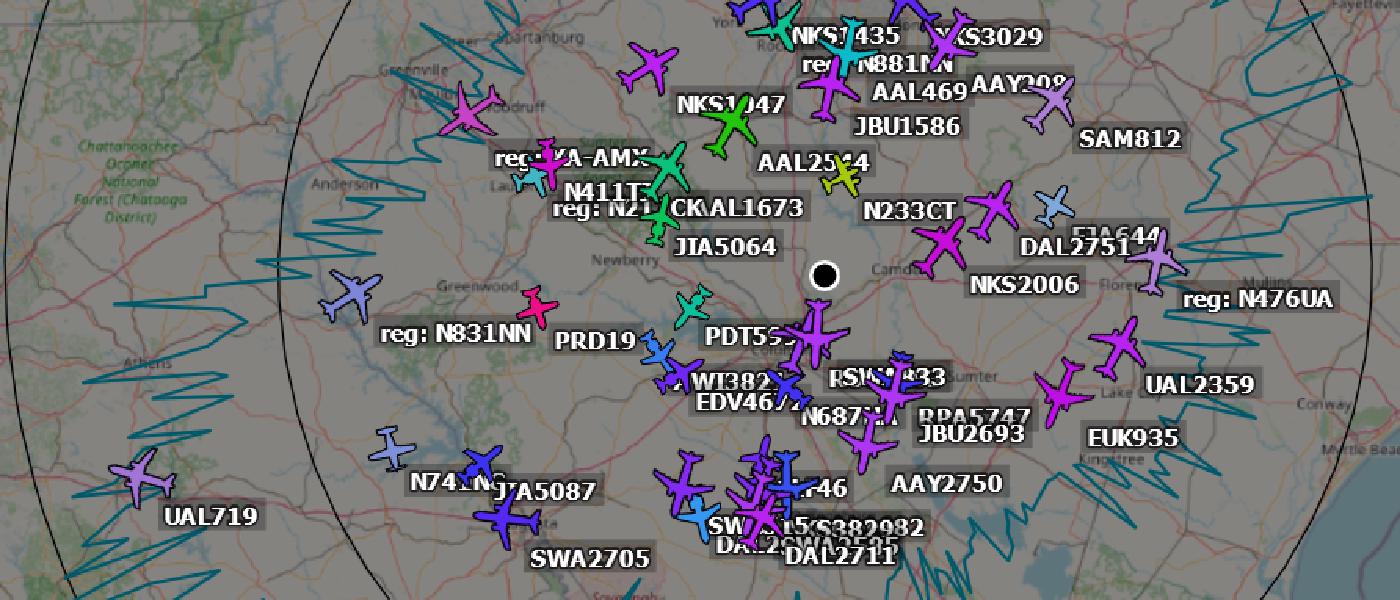
That’s it. You’re done. Here’s some of what I can see in my local area
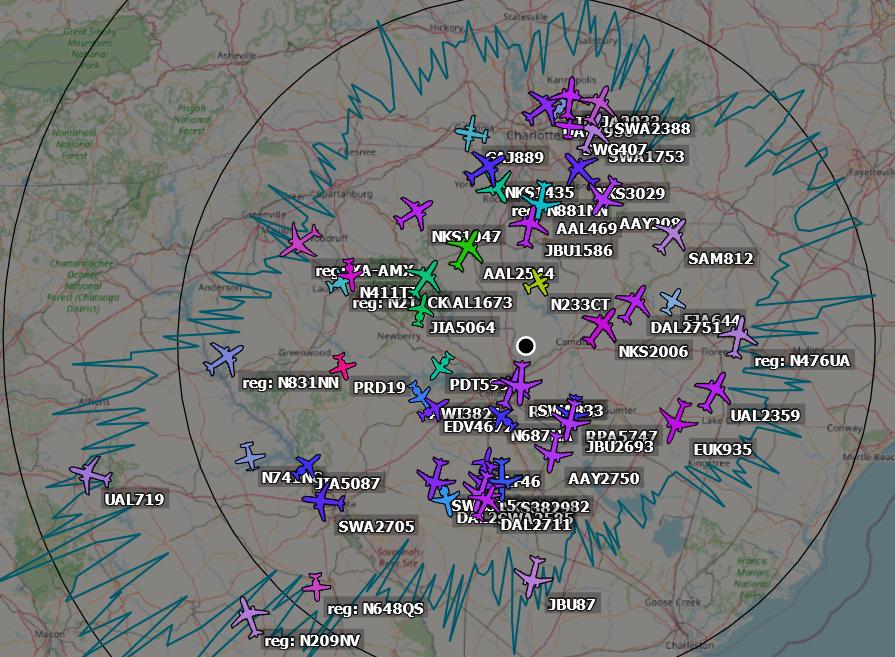
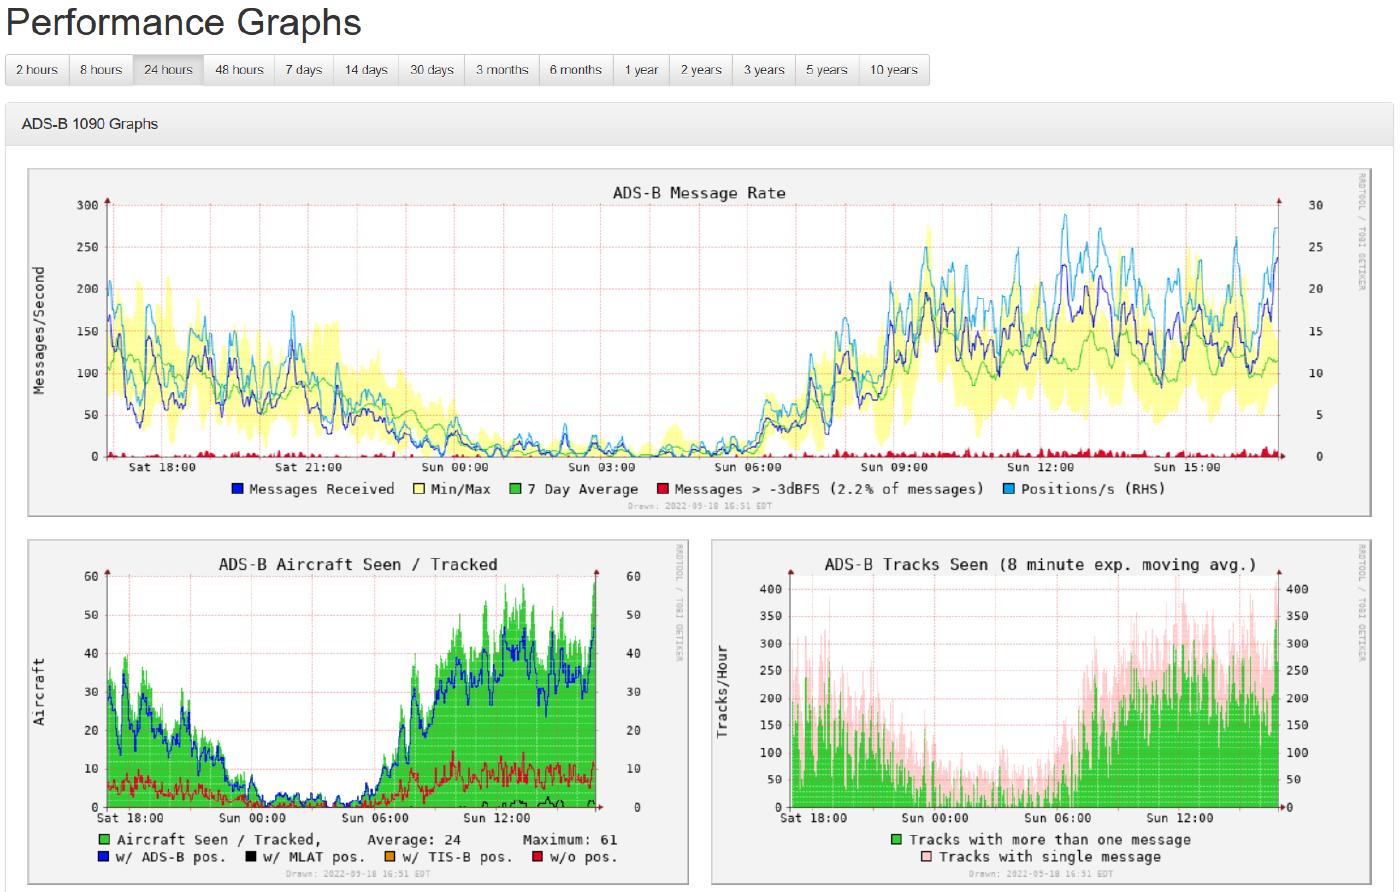
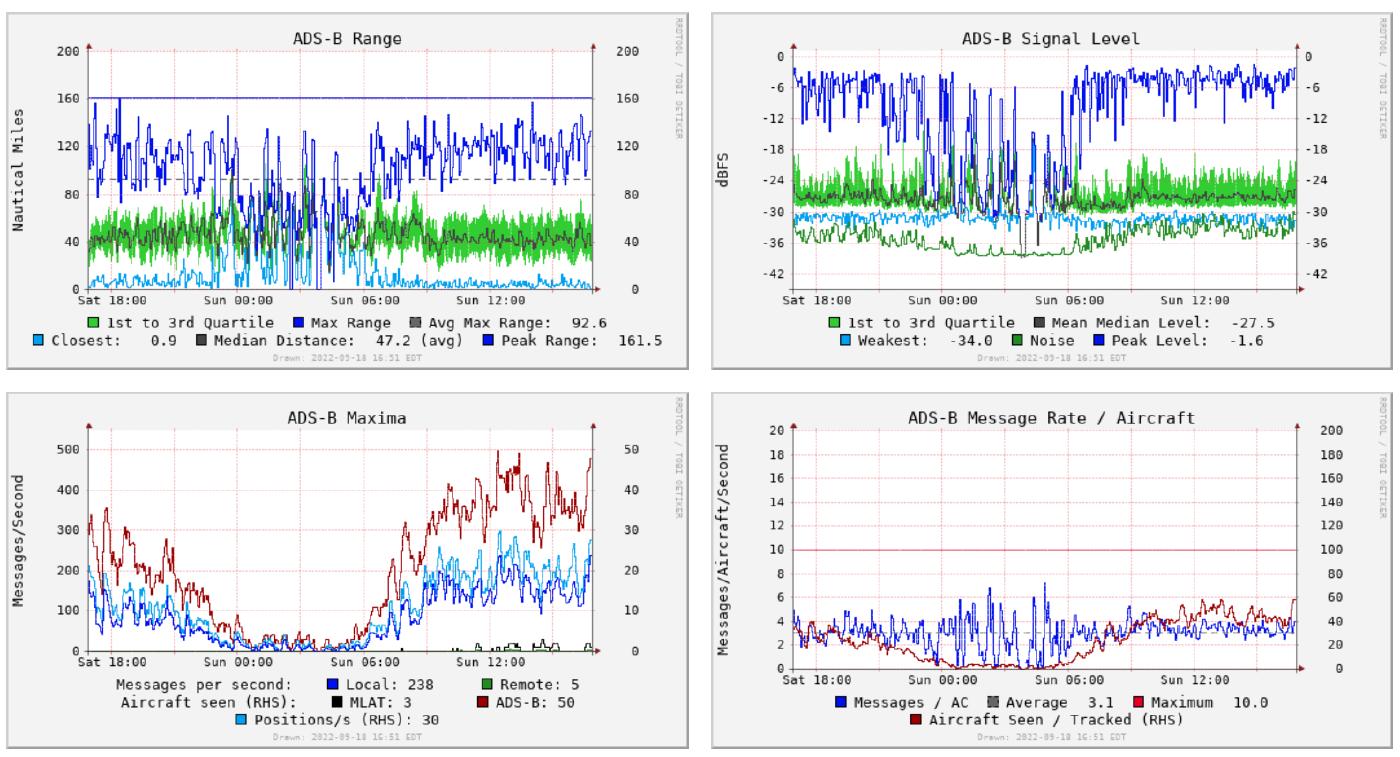
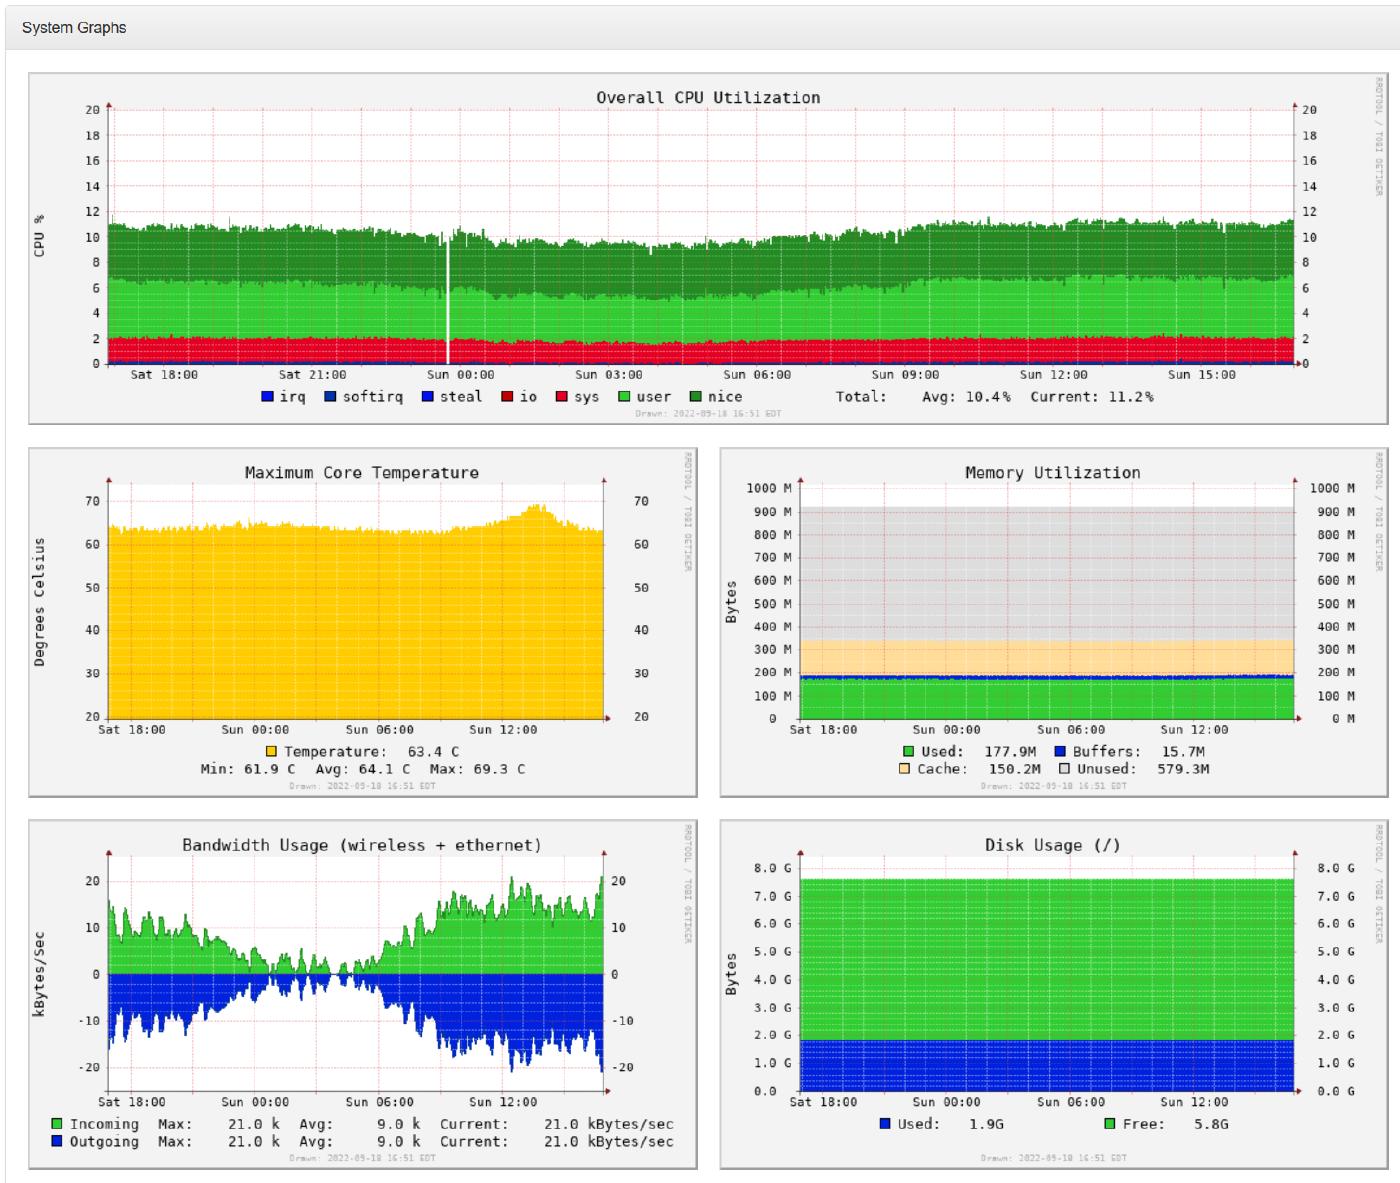
At the time I captured that screenshot, I was tracking 60 unique aircraft at a max distance of about 120 miles. You also get a dashboard with various statistics and Pi health information
Conclusion
I find it fascinating that this type of data is broadcast over the air that anyone can decode and share. It’s not private data, so I’m not surprised that it’s not encrypted either. But it’s really interesting how aircraft is tracked and the type of information you can get just using an SDR receiver and a Raspberry Pi. I’m also amazed at how simple of a process it was to get this up and running, and it didn’t break the bank either (thankfully I already had a spare Raspberry Pi laying around, since prices are crazy right now).
So the next time you hear that loud plane over your house, you can pull up your receiver and see EXACTLY what that plane (or helicopter) was, what altitude it was at, how fast it was traveling, and then look up the registration number to see where it came from and where it’s going.